Before Annimal Instinct, I blogged at a different location, that I’ve phased out for a variety of reasons. Sometimes it’s just time for a new vessel in which to pour thoughts, projects, and ideas. I have decided to share some of my most popular posts from that old blog here before shutting it down for good. The following post was originally written in July 2009. My husband Tyler and I were living in a teeny tiny rental house in one of Wichita’s historic neighborhoods. We had been married a few months earlier and the only thing smaller than our house was our budget. It was here we started doing bigger DIY projects and began learning the skills we’d use someday remodeling an entire house. This media unit was our first DIY furniture project and it’s actually still in use in our basement! It’s been a sturdy, much-loved piece of furniture. It will be replaced someday soon, as our style has changed as our lives have, but I’ll always have a fond spot in my heart for this media unit. Without further ado, please enjoy “First Time Furniture Builders Tackle a Media Console”.
– – Original Post – –
The quest for a new media unit began almost before the new Samsung LCD TV had shed its styrofoam skin. Although we had planned to utilize the existing TV stand, it was obvious that the masterpiece of engineering otherwise known as an HD television deserved a better home. We searched stores for months. Not willing to confine ourselves to the measly offerings of furniture chain stores in Wichita, Kansas, we searched the internet and I trolled Craigslist and antiques stores for months. Tyler wanted something with lots of storage, I hoped for a piece with a slim profile. Finally, inspiration struck. I was inspired by this post:
http://blog.designpublic.com/2009/06/17/alis-diy-shelving/
We expanded the basic rod/shelving idea and added a few custom tweaks to make it a perfect fit for our living space. We cut the length down to 8 feet and the depth to 12 inches and added extra shelving in the center. The center shelves are spaced to offer the perfect nook for our media components and provide the added benefit of extra stabilization. We also used smaller rods, increased the number of rods, and added wheels to the bottom to add height, stability, and mobility – all of which were especially important to us given that the unit is placed on carpeted floors.
Ingredients:
- (4) 8′ x 12″ x 1″ pine boards – one of which was cut into 3 equal 32″ pieces [ done for free at Home Depot ]
- (8) 24″ threaded rods of 5/8″ diameter [ our Home Depot carries these rods in a variety of diameters and lengths and this allowed us to purchase the size we needed and not have to worry about cutting to size ]
- (64) sets of washers/nuts
- (8) wheels
- screws for attaching wheels
- drill
- wrench
- clamps [ For easier drilling, we used a template for hole placement and drilled through multiple sheets of wood at once. The clamps kept everything still. ]
- level [ to check those shelves! ]
- pencil, ruler, etc. [ we wanted to ensure that our shelves were spaced evenly ]
- stain + old socks for application
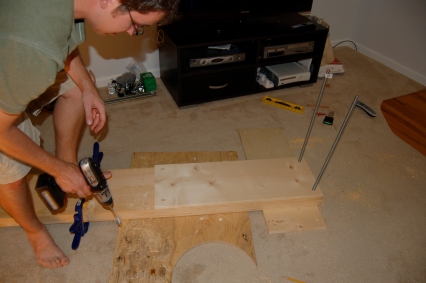
We followed the directions from the above link – basically, drilling holes in the boards is the only real preparatory step, although we also did some light sanding.
We opted for a darker look and added two coats of stain to the top of the unit and one coat to the bottom. The color complements the silver of the metal nicely and we were glad to have taken this extra step, even though it did add an extra day and a half to our project. Construction was relatively easy and occurred in our living room. We initially encountered some serious frustrations when drilling the holes that required a couple of extra trips to the hardware store. First, we wore out the wood bore that we bought for the occasion. Then, the holes were a tight fit that made imperfections in the drilling angle a complete deal breaker. By increasing the size of our holes we eliminated this problem. Since we used larger washers for a more industrial look it was not a problem to give the rods a little more wiggle room. In retrospect – we wished we had used a more standard size of rod. The 5/8″ diameter left us with few options for other hardware and for the drill bit. For instance, at our local Home Depot, if we had wanted to use the locking washer of the original plan for the base of the unit like in the original plan, we would have needed to use either 1/2″ or 3/4″ diameter rods as intermediates sizes were unavailable. Consider what is available at your local hardware store when planning your own unit – it will save you a lot headaches!
Tyler did most of the work himself, although we both did the assembling together. This could be accomplished by one person or quite easily by two people. This was the first piece of furniture either of us have ever built – if I can do it, you can do it! I love that this project can be so easily customized. My little sister has already requested a custom unit of her own sized to store her large collection of records. Obviously shelves are great for storing media items or books, but this could even work nicely as a custom closet idea or for storage in a modern kitchen or bathroom.
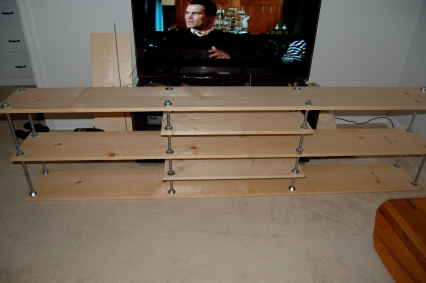
- Almost done – still needs to have wheels added and be stained.
We love the finished console. It provides an extremely efficient means of storage in our small space (no wasted depth!) and has a casual industrial feel that we love. The console is 8 feet long on a 9 foot wall. We plan to add a second shorter unit on the right hand side that will turn this into an L-shaped monster storage center that will maximize every last inch of space. Our house is around 800 square feet so even those spare inches behind the door count!
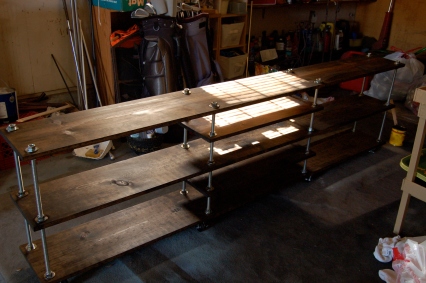
- Two coats of stain gave just the look we wanted.
It has been more than a week since we finished this project and I love our media console more every day! I’m grateful to Ali for sharing his idea with the internet and to my husband for turning my sketch into an actual piece of furniture. This is a beautiful solution that appeals to my aesthetics, organizational needs, and DIY sensibility.
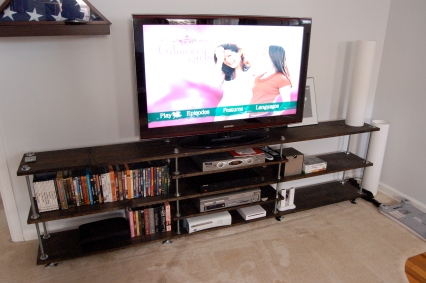
- The finished product – a fitting home for our new tv!
Please share comments and questions! We would love to hear what you think! Would you consider building something like this for your home?

Thanks so much for this post! I love this design…modern lines with that timeless aged look. Looks like I found another summer project 🙂
hey, i love this project! it definitely fits in with the kind of stuff i’m building on my blog, . i think i’m going to modify mine into some sort of dresser. anyways, love your blog. keep it up!
hope you don’t mind if i link to your blog when i post my entry!
Hey, so glad to see this post again.
I’m getting ready to tackle the same sort of thing and was curious if you’ve had any tipping problems or overbalancing issues, especially with the wheels.
Great work!
Tony
Tony-
Thanks! This console has remained with us through 1 move and 2 different TVs. We have never had any tipping issues. It has a 56″ Samsung LCD TV on it now. When we move it more than a few inches (I like to rearrange furniture… haha) we one of us holds the TV steady as we roll the console around to be safe. But, even with two rowdy 65+ lb dogs bumping into it, when it’s stationary we have had no trouble. Hope that helps! Good luck!
Love it! Thinking of altering to make a taller book shelf.
Do recall what the total cost?
Thank you!
I’m sorry, Teresa, I don’t recall the total cost. It would have been somewhere between $75-200, though.